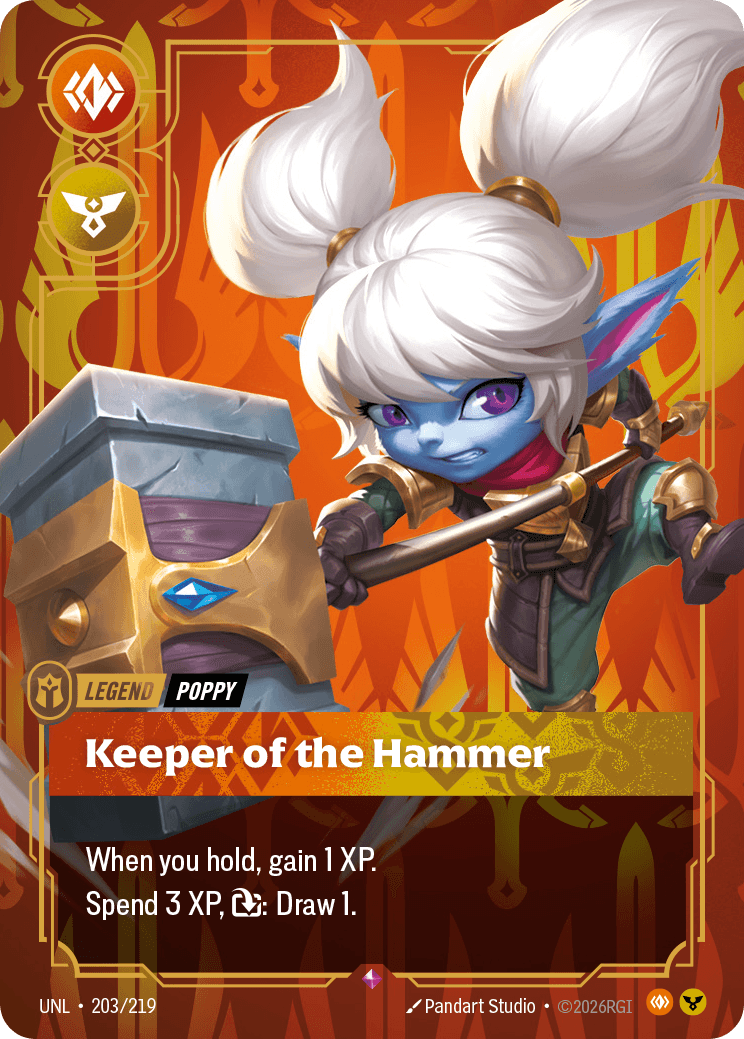
Rek'Sai is not the mindless Fury aggro deck the domain colors suggest. Void Burrower is one of the trickiest tempo legends in the format because it looks like it wants to race you, then quietly turns every good attack into free cards and a widening scoreboard lead. The Fury half develops cheap ready bodies that hit immediately, while the Order half adds disruption and a top-deck engine that punishes any turn you fall behind on points. The legend is at its best when it builds an early conquer lead — it has plenty of tools to punish an over-committing opponent, but very few tools to play from behind.
A note on how we write this. We do not publish a card-for-card Rek'Sai 'package' we cannot verify from our own current data, and we do not send you to someone else's site to find one. What we give you instead is durable: the gameplan Rek'Sai is running, the cards in her kit and what each one does, and a counter plan keyed to mechanics. Read any card's exact wording in the card database, build both sides in the deck builder, compare public shells in Riftbound decks, and map the rest of your gauntlet on Riftbound Counters.
What We Can And Can't Tell You
We do not have a current first-party Rek'Sai decklist on record for this format, so we are not going to hand you a 40-card list dressed up as the live version. That honesty is the point. A counter plan built on 'Rek'Sai always runs these cards' rots the moment the list shifts. A counter plan built on 'here is what Void Burrower is trying to do, and here is the kit that punishes loose play' keeps working. This guide is the second kind.
Why This Matchup Matters Now
Rek'Sai matters because she solves the usual weakness of an aggressive deck. Most fast decks run out of cards. Void Burrower does not, because her legend turns board dominance into card advantage. She has earned respect as a high-ceiling tempo legend, and the reason is structural rather than luck: the engine rewards exactly the thing an aggressive deck already wants to do — attack and win battlefields.
Read the legend carefully: when you conquer, you may exhaust Rek'Sai to reveal the top two cards of your Main Deck, banish one, play it, and recycle the rest. That is not a small trigger. Every conquer is a dig plus a free card off the top. In a deck stuffed with cheap Fury units, that free card is very often another body that immediately joins the pressure. The counter rule is simple: every conquer you allow is a card and a tempo swing you are handing the deck for free. Deny the conquer and you deny the engine.
The Void Burrower Engine And Why Conquers Are Currency
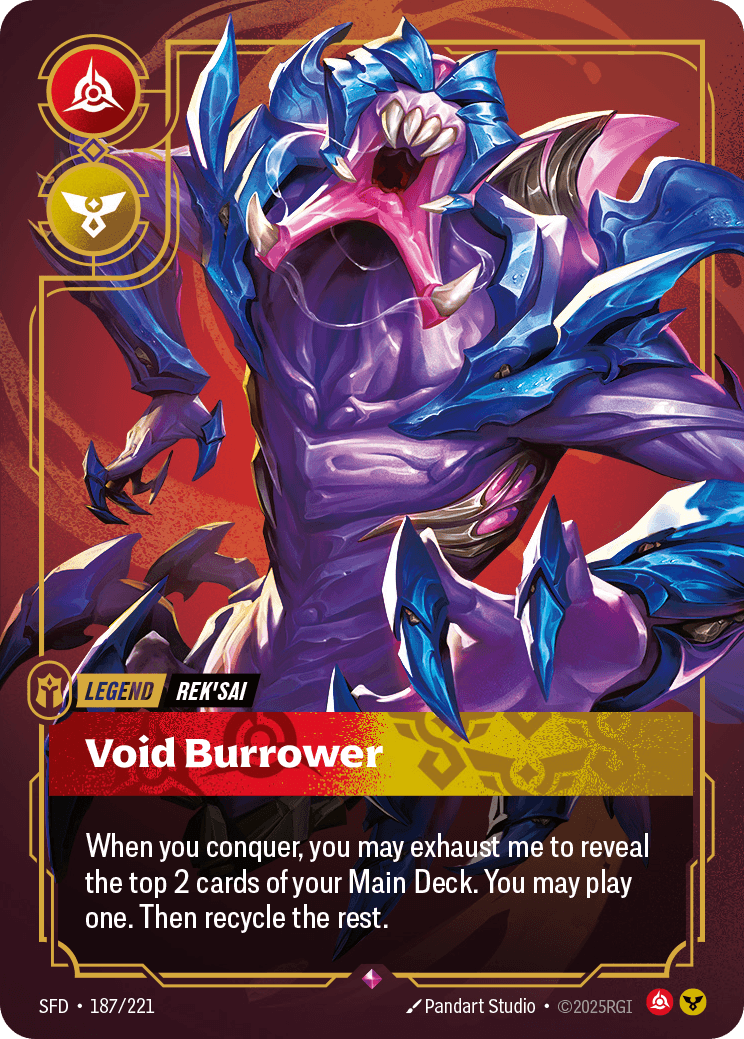
Fury/Order Legend
Rek'sai - Void Burrower
The legend engine: when she conquers, she can dig two off the top and play one for free. Every conquer you allow is a card and a tempo swing, so denying conquers is the whole matchup.
Void Burrower converts board position into resources, and it does so on your opponent's terms. The trigger only fires on conquer, which is the single most important fact in the matchup.
A conquer happens when Rek'Sai controls a battlefield uncontested at the resolution step. So the counterplay is not always removal. Often the better play is to leave a body on the battlefield, even a small one, so the fight is contested and the conquer never resolves. No conquer means no exhaust, no dig, no free card.
This is why raw removal can be a trap. If you kill the attacker but leave the battlefield empty, and Rek'Sai simply sends a second Accelerate body in, you spent a card and still gave up the conquer. The disciplined line is to keep a defender present, absorb the hit, and force the Rek'Sai pilot to over-invest before the map tips. Use the card database here: search for cheap, sticky bodies and ready blockers, the exact cards that let you contest a battlefield without spending a premium answer every turn.
What Rek'Sai Is Trying To Do
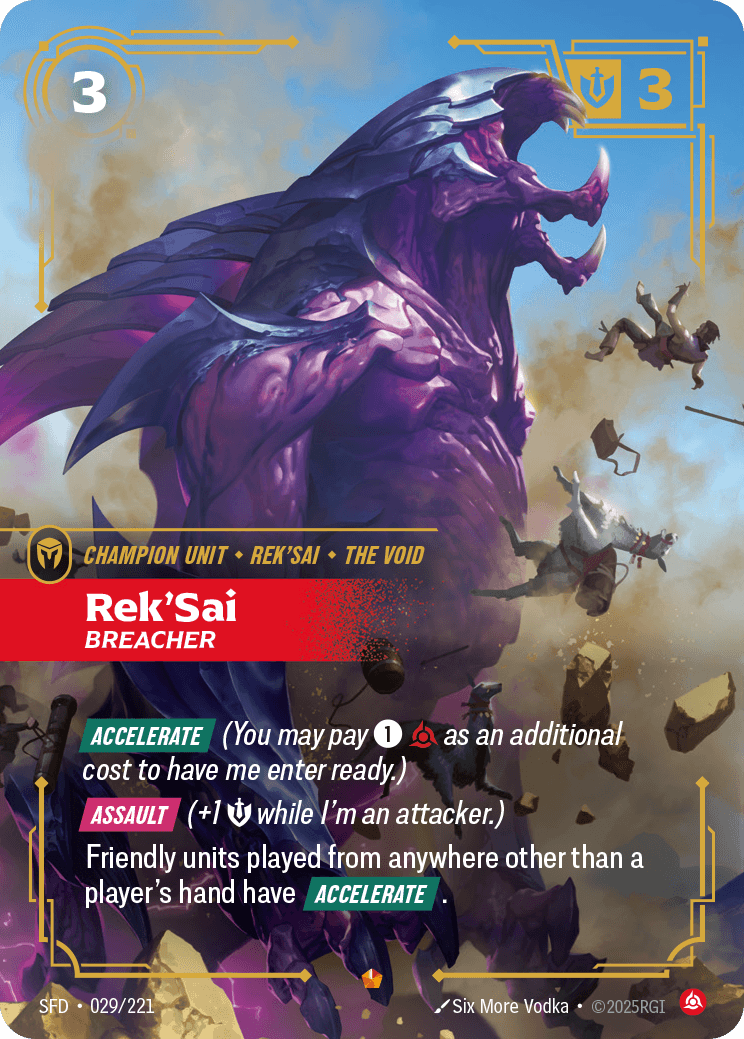
Fury Unit
Rek'Sai - Breacher
In Rek'Sai's kit: enters ready with Accelerate and gives Accelerate to units played from anywhere other than hand, so cards dug off the top attack the same turn. Answer her before a big dig, or deny the conquer that chains it.
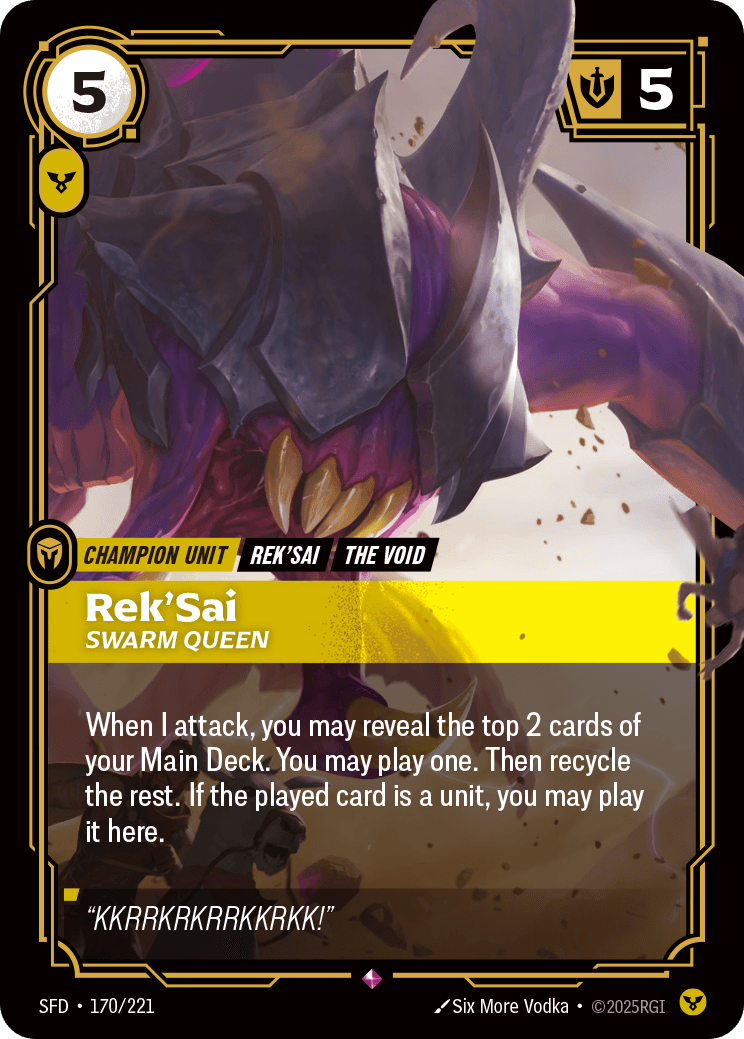
Order Unit
Rek'Sai - Swarm Queen
In Rek'Sai's kit: when she attacks she digs and can drop a unit straight into the fight, entering ready if Breacher is out. A block that looks even before the swing can be outnumbered after it, so count the extra body.
Most current Rek'Sai shells are off-tempo Fury/Order, not pure aggro. The Rek'Sai player wants to land a cheap ready body early and take a battlefield before you can set up, conquer at least once to fire Void Burrower and start digging for more units, use Rek'Sai - Breacher so those dug-up units enter ready and keep the pressure rolling, deploy Rek'Sai - Swarm Queen so attacks themselves refill the board at the fight, hold Fury interaction to punish your attempt to fight back, and lean on a signature dig spell for a second wind when the natural draw stalls.
That means the matchup is not solved by killing the first body. Sometimes that is correct. But if you spend your whole turn answering one cheap attacker and let Rek'Sai conquer a different lane, you fed the engine anyway. Before every key turn, ask this question: does this line let Rek'Sai conquer somewhere? If the answer is yes and you cannot afford the free card that follows, you need a different line.
Rek'Sai's Kit — What To Respect
These are the legend-locked pieces in Rek'Sai's kit. Naming them is not the same as claiming a given list runs a specific count of each — kits vary list to list — so respect them for what they do, and confirm the exact wording in the card database.
- Rek'Sai - Breacher is the reason a Rek'Sai turn can spiral. She enters ready with Accelerate and gains Might while attacking with Assault, and her static text gives Accelerate to friendly units played from anywhere other than a player's hand. That is the exact clause that makes the legend so dangerous: when Void Burrower digs and plays a unit off the top, that unit was not played from hand, so it enters ready and can attack the same turn. A single conquer can become two attackers.
- Rek'Sai - Swarm Queen is the midgame version of the same idea. When she attacks, you may reveal the top two cards, banish one, and if it is a unit you may play it right there. With Breacher on the board, that new unit enters ready too. So a block that looks even before her swing can be badly outnumbered after it.
- Her signature dig spell ignores the conquer lock entirely. It reveals off the top and plays a discounted body without needing a conquer, which is your reminder that denying conquers switches off the main engine but not this one. It is a single card, not a repeatable loop, so it will not rebuild a lost game on its own — but never assume a stalled draw means she is out of threats.
How To Beat Rek'Sai
Contest The Battlefield, Not The First Unit
Your first job is to make sure Rek'Sai cannot conquer for free. Keeping a defender present when conquers are checked is worth more than killing an attacker and leaving the lane empty. You do not need to win these fights — you need a body standing on the contested battlefield so the conquer never resolves. A hand that cannot put a body on a contested battlefield or hold a cheap answer to a ready attacker is usually too slow.
Respect Breacher On The Engine Turn
Treat Breacher as a priority answer when she is on the board with the engine online, not just as a three-drop. If you can remove her before a big dig turn, the units Rek'Sai finds enter exhausted instead of ready, and the snowball slows to a crawl. If you cannot remove her, do not hand her a conquer that lets the engine chain.
Count The Extra Body Against Swarm Queen
When Swarm Queen swings into a battlefield, you are not just blocking a five-cost body — you may be blocking that body plus whatever unit the dig finds, dropped straight into the same fight and entering ready if Breacher is out. The best answer is to break up the fight before it happens: pressure a second battlefield so Swarm Queen cannot safely attack, hold a clean removal for the Queen herself, and when you do block, count the possibility of one extra ready unit before you commit.
Don't Trust Even Blocks
Rek'Sai leans on cheap Fury interaction that makes even blocks turn into losses. Expect repeatable combat tricks that stack extra Might on an attacker during a showdown, and Hidden burn that can deal a big chunk to a unit — more if it is attacking — aimed squarely at your counterattack. Do not commit your key attacker into a defended lane while the Rek'Sai pilot has open resources and a Hidden card set, and do not assume a block is safe because the printed Might is in your favor. Make Rek'Sai spend that interaction on low-stakes exchanges before the turn that actually decides the scoreboard.
Deny Conquers Is Necessary, Not Sufficient
Denying the conquer switches off the main engine, but her signature dig fires without one. On a turn you contest every battlefield and give up no free card, she can still dig two deep and drop a discounted body onto the board — one that enters ready with Breacher out. Play around it by keeping a blocker in reserve on the turn Rek'Sai holds up resources behind an empty board, and never treat a stalled draw as proof she is out of gas.
Mulligan Guide Against Rek'Sai
Keep hands that can do at least two of these things:
- Contest a battlefield on turn one or two so the first conquer is denied.
- Hold a cheap, resilient blocker that survives an entry ping.
- Present pressure on a second battlefield so Swarm Queen cannot attack freely.
- Answer Breacher on the turn the dig engine would otherwise chain.
- Keep bodies on the map rather than trading into an empty board.
Ship hands that only come online later. A pile of expensive cards and one reactive spell is not enough when Rek'Sai is already conquering and digging on turn two. The ideal keep is functional, not flashy: it makes the first conquer cost something.
What To Bring
If you tune a list for the matchup, build around a plan instead of a pile of maybes:
- Cheap, sticky contest bodies that hold a battlefield through the first attack and deny the opening conquer.
- Ready blockers or Reaction answers so you are never caught tapped out into an Accelerate turn.
- Clean removal for Rek'Sai - Breacher and Rek'Sai - Swarm Queen, the two cards that power the engine.
- A flex answer for the discounted body her signature dig can drop out of nowhere.
- A recovery or reach card to close before the deck rebuilds.
The big warning: do not overboard into slow control. Rek'Sai is strongest when the opponent falls behind on points, and a slower deck falls behind faster. You want cleaner interaction and stickier bodies, not a passive pile that hands Void Burrower free conquers while you set up.
Turn By Turn Counter Plan
Turns 1-2: Contest The First Battlefield, Not The First Unit
Your first job is to make sure Rek'Sai cannot conquer for free. A hand that cannot put a body on a contested battlefield or hold a cheap answer to a ready attacker is usually too slow. You do not need to win these fights; you need a defender present when conquers are checked. Remember a cheap Fury body can ping a small blocker on entry, so if your only defender is fragile, have a backup plan. If the Rek'Sai pilot conquers on turn one and fires Void Burrower while you develop nothing, their board is already snowballing.
Turns 3-4: Break The Engine Turn
This is where the matchup usually turns. Watch for the turn where Rek'Sai has Breacher on board and is set up to conquer and dig. That is the turn to spend interaction. Removing Breacher before a big dig means the units Rek'Sai finds enter exhausted, not ready. Denying the conquer means the dig never happens at all. Either outcome is worth a premium answer. Answering a random attacker that was not going to conquer is not.
Turns 5-6: Punish The Over-Commit
Rek'Sai has few tools to play from behind, so once you have stabilized the board and kept the scoreboard close, you flip to offense. The deck is designed to punish opponents who over-extend, so do not hand it that opportunity, but do force it to defend. Make Rek'Sai choose between pushing a fragile lead and protecting her own board. Every turn she spends on defense is a turn Void Burrower is not conquering and digging.
Late Game: Close Before The Second Wind
Rek'Sai has few tools to play from behind, but her signature dig and Breacher can still find a fresh attacker off the top when her hand runs dry. If the game stretches, do not hand her a free window to dig and rebuild. Keep denying conquers, hold a blocker for a surprise discounted body, and close the game before her top-deck engine buys a second wind.
Matchup Plans By Archetype
Aggro And Pressure Decks
You are racing the racer, so make it a race Rek'Sai does not want. Contest her battlefields so her conquers are denied, then push a second lane she cannot defend. If you commit everything to one battlefield, her Fury tricks and Hidden burn can blow up the exchange. Spread pressure so she has to spend interaction defensively.
Midrange Decks
You have the cleanest path and the highest risk of getting greedy. Your bodies need to hold the map early, not sit in hand for a big turn six. Keep enough interaction to break the engine turn, then turn the corner. If you trade one-for-one forever, Void Burrower's free cards pull ahead.
Control Decks
Do not pretend the matchup starts on turn six. You need early speed bumps and cheap answers, because a Rek'Sai lead built over the first three turns is very hard to unwind once the top-deck engine is fueling her hand. The control player who waits for the perfect sweep often loses the scoreboard before the sweep is worth casting.
Combo And Engine Decks
Your priority is buying setup turns without leaking conquers. If your engine does nothing on the first two turns, Rek'Sai builds a lead and forces you to combo from behind — the exact spot where her disruption is best. Interact while you develop so she cannot free-roll the early map.
Common Mistakes Against Rek'Sai
These are the mistakes that make Rek'Sai feel unbeatable:
- Killing the first attacker but leaving the battlefield empty, handing over the conquer anyway.
- Ignoring Breacher until the dig turn has already chained into ready attackers.
- Blocking Swarm Queen without counting the extra unit her attack can drop into the fight.
- Committing your best body into a defended lane while a Hidden card is set.
- Trusting even blocks that a repeatable combat trick can flip with extra Might.
- Letting a stalled draw lull you, then getting blown out by a dig that drops a discounted ready attacker.
- Playing slow and passive, the exact texture the off-tempo Order half is built to punish.
If you fix only one habit, fix this one: stop thinking about killing units and start thinking about denying conquers. The engine only runs when Rek'Sai conquers.
Practice Checklist
Before you call your Rek'Sai matchup ready, answer these honestly:
- Can your deck contest a battlefield before Rek'Sai's first clean conquer?
- Do you know which card in your deck best answers Rek'Sai - Breacher?
- Can your small blocker survive an entry ping?
- Can you beat a Swarm Queen attack that drops an extra ready unit?
- Do you count repeatable combat tricks before committing to a block?
- Can you pressure a second lane while holding interaction for the engine turn?
- Does your list keep you proactive enough to punish her weak play-from-behind?
If the answer is no to two or more of those, the matchup needs more work.
What To Test On RiftStorm
This article should become reps, not just reading. Use Riftbound Counters to map Rek'Sai against the rest of your expected room. Open the deck builder and build two lists: your real deck and a Rek'Sai test shell with cheap Fury bodies, Breacher, and Swarm Queen. Goldfish the first three turns, then play only the turns where a conquer is on the line. Use the card database to search for sticky bodies, ready blockers, cheap removal, and Reaction interaction. Then browse community decks to see how other players are contesting the early map.
Bottom Line
Rek'Sai is a dangerous Riftbound deck because she turns board dominance into cards. The Fury half develops cheap ready bodies and Accelerate threats, the Order half disrupts and punishes over-extension, and the Void Burrower legend converts every conquer into a free card off the top. Breacher makes those free cards enter ready, and the whole thing snowballs.
You beat Rek'Sai by making conquers expensive. Contest the first battlefield instead of the first unit. Respect Breacher on the engine turn. Count the combat tricks and Swarm Queen's extra body before you block. Keep bodies on the map, deny the free conquers, and then punish a deck that was never built to play from behind. That is the difference between losing to the idea of Rek'Sai and beating the actual deck across the table.